As textures are Templar Creation’s main product, it seems appropriate to have some tutorials about using them. This is the first in a series which will start with the basics, and eventually progress on to advanced uses of textures.
To begin at the beginning…
I’ll assume that you already know the basics of constructing prims, and at least know how to open the Build dialog and get to the various tabs.
To start this tutorial, open the Build dialog, and rez a simple cube. We’ll use this to go through the different ways of applying textures.
Once you’ve rezzed the cube, close the Build dialog (you’ll find out why in a minute).
Let’s start by actually locating some textures in your inventory. The Inventory is divided into two basic sections – “My Inventory”, and “Library”. The “My Inventory” section holds everything that you have bought or uploaded yourself. The “Library” section holds things which are supplied for free by Linden Lab.
Both sections include “Textures” folders, which are, not surprisingly, the first place to go looking for textures. They aren’t the only places, though. It’s perfectly possible to move textures into other folders. More importantly, and perhaps a little less obviously, snapshots can also be used as textures.
It’s worth noting that when you upload an image from your computer (from the File | Upload Image menu option), it will always go into your Textures folder. Of course, you can move it from there once it has been uploaded.
So, let’s use one of these textures. It’s actually possible to apply a texture without opening the Build dialog. Simply drag the texture from your inventory onto the cube — this will immediately apply the texture on to whichever side of the cube you dropped it.
Obviously, this will only work on prims that belong to you (and for which you have modify permissions).
That’s the quickest and simplest way of applying a texture, and is sometimes quite useful. Usually, though, you will want to do more than just apply a texture to a single side of a prim, so let’s move on to the more normal ways of applying textures.
Right-click the cube, and select “Edit”, to open the Build dialog.
Select the “Textures” tab (it’s the last one).
There are multiple options and controls on this tab, but for the moment we will simply concentrate on the texture image itself. If you’ve followed the previous step for applying a texture, you’ll notice that it has “Multiple” printed over it, to tell you that this prim has more than one texture applied.
Click the image, and a texture selection dialog will appear:
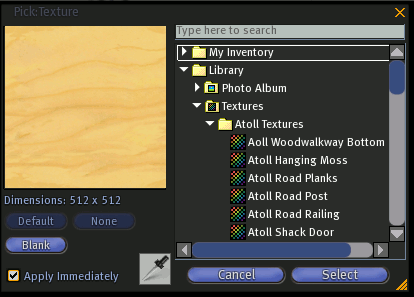
On the left is a picture of the current texture, along with some buttons. Click the “Blank” button — your cube will turn white. If you click the “Default” button, the cube will be textured with the familiar plywood texture.
There is also a “None” button. I’ve never seen this enabled, and have no idea what it does…
On the right you should see a list of the textures in your inventory. This will go through your entire inventory, finding every copiable texture (the texture has to have copy permissions for you to be able to use it). If you have a lot of textures and/or SL is being laggy, this can take a while to fill.
If you click on one of the listed textures, it will be displayed in the texture image box. If the ‘Apply Immediately’ box is ticked (which it is by default), the texture will also be applied to the prim — this is a useful way of quickly checking what different textures will look like. Click “Select” to make the texture permanent (well, until you change it again!), or “Cancel” to revert to the original texture.
Finally, for yet another way to select a texture, you can click the pipette button that you will see below and to the right of the “Default” and “Blank” buttons. You can then click on any other visible prim, and the texture will be picked up from that prim (provided that is it copiable).
For now, however, click the “Default” button, so that you end up with a plywood cube.
Another way of applying a texture is to drag it from your inventory and drop it on to the texture image in the Build dialog. This tends to be a bit more tedious and awkward than using the Texture Selection dialog.
Back on the Build dialog, to the right of the texture image is a “Color” image. This will be white at the moment. Click on it, and a color selection dialog will appear:
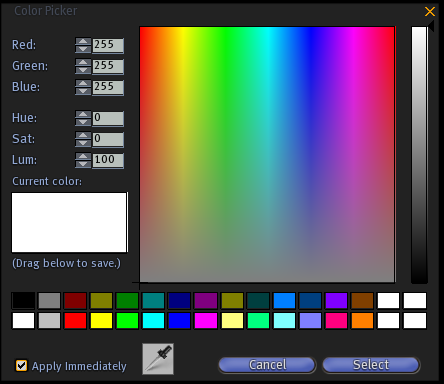
If you have ever used paint programs, this will probably seem quite familiar, and I won’t go into details about it.
Select a color.
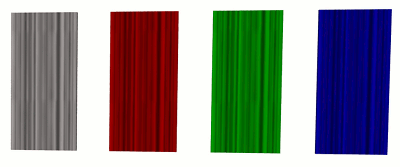
Your cube will still have the plywood texture, but will now be colored. You can do this with any texture, so it is quite possible to generate different-looking textures from one basic texture.
For example, here is a basic, greyscale “drape” texture, with different colors applied:
Now, suppose you want to have different textures on different sides of the cube. Of course, you can use the drag method that we saw above, but this is rather tedious and inflexible. A better way is to use the “Select texture” radio button which you will see on the top half of the Build dialog.
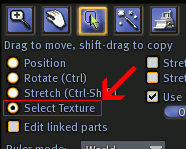
Click this button, then click on one side of the cube. A symbol will appear on the cube, showing you which part is currently selected:
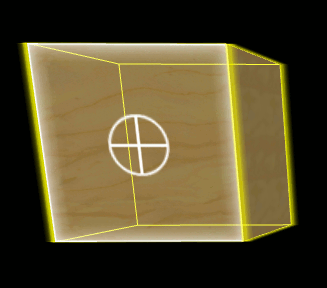
If you now click the texture image on the Build dialog and select a new texture, it will only be applied to that side.
You can select multiple sides at once. Hold down the Shift key on your keyboard as you click on the sides you want to select.
In theory, you can also do this with multiple prims, and apply a texture to the sides of several prims at once. In practice, I have found that SL does not handle this very well at all, and it is probably best to stick to one prim at a time.
There is one more way of applying a texture, which is by using a script. This is something you might do if you want the texture to change in reaction to some event, but is well beyond the scope of this tutorial. I shall probably cover this in a later, more advanced tutorial.
That was quite a hefty first tutorial. I’ll be back later with the next one, when I’ll talk about the Repeat, Rotate, and Offset parameters.
Leave a Reply
You must be logged in to post a comment.